


-
Programing Instructions
-
Link Shades to a Remote Control
1. Choose the channel that you want to link the shade to.
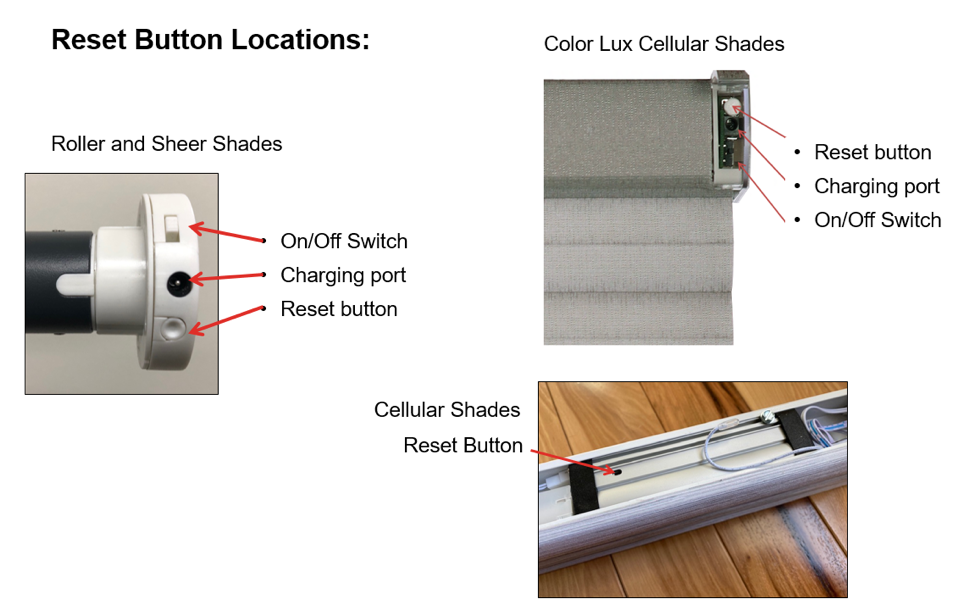
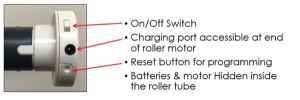
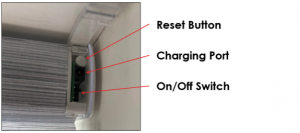
2. Press the reset button on the shade.
Shade will beep slowly.
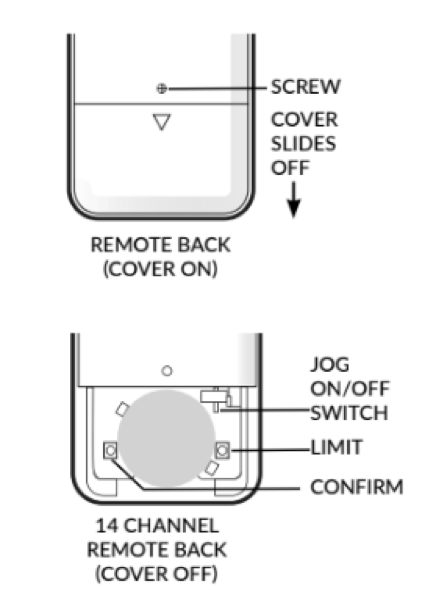
3. Press the (c) confirm button on the back of the remote control. Shade will beep quickly 3 times and jog to confirm your link.
-
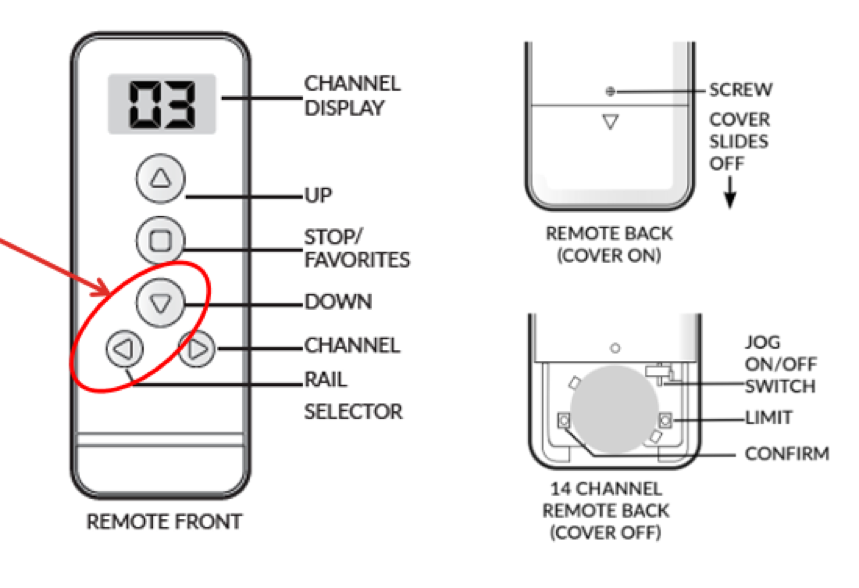
Operating Your Remote Control
 Raise the shade, or selected rail
 Stop shade if moving, or go to favorite position if shade is not moving
 Lower the shade, or selected rail
 Scroll forward through the channels
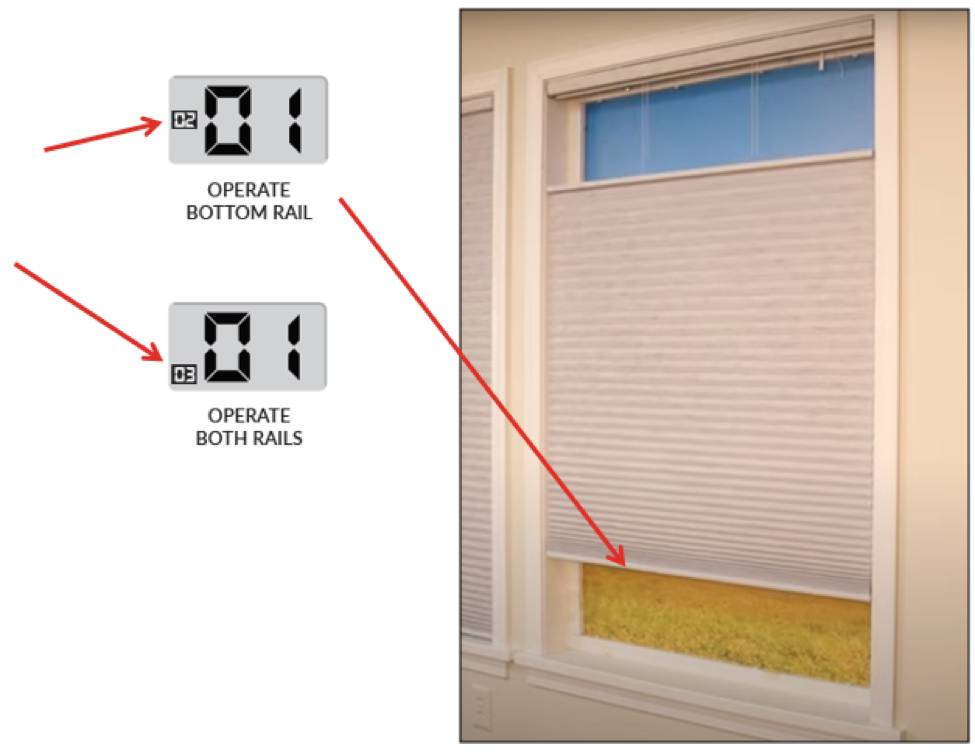
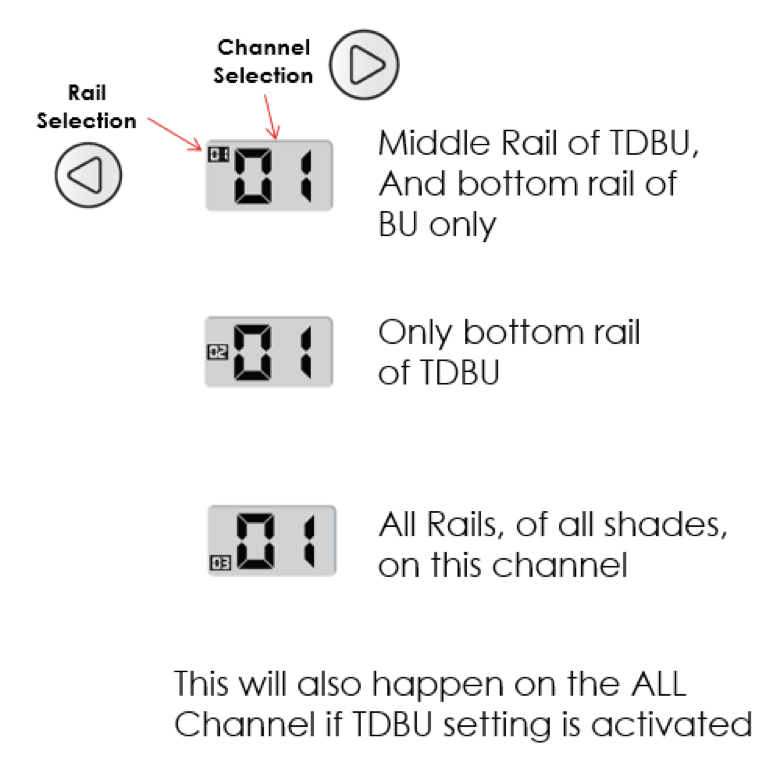
 Select middle, bottom or both rails on a Top Down-Bottom Up shade
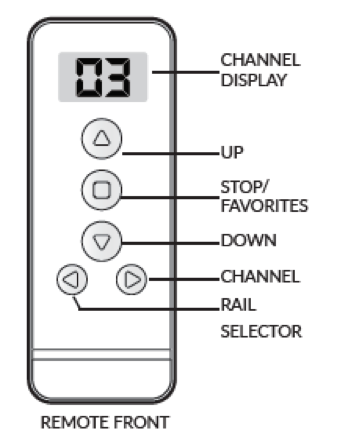
-
How many shades can I assign per channel?
We strongly recommend that one shade is assigned to each channel as needed, in order to make programming and operation easier; however, you can link an unlimited number of shades to an individual channel. You can group shades in Rooms on the smart apps, or you can link individual shades to multiple channels on the remote to create groups of shades also.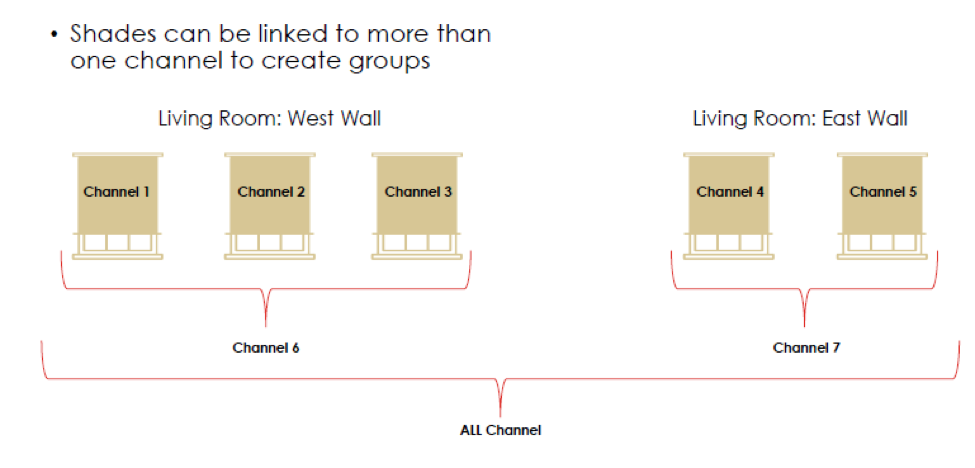
-
Turn on/off Top Down-Bottom Up Control Feature
If you assign a channel to a Top Down-Bottom Up Shade, this feature should be turned on, on that channel. Otherwise, you should have this feature turned off.
– Select the channel that you want to use for your Top Down-Bottom Up Shade
– Press and hold the DOWN and RAIL SELECTOR buttons together until the rail selector # shows up on the left side of the screen.
– To deactivate this function use the same process
– The Top Down-Bottom Up function can be activated on individual channels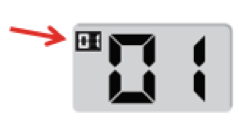
-
Setting a Favorite Position
1. Move shade to desired Favorite Position using the UP and DOWN arrow buttons
2. Select the proper channel for the shade you want to adjust
3. Unlink all other shades assigned to that channel
4. Press the Limit Button and UP button together until the shade responds (shade will beep and jog to confirm setting)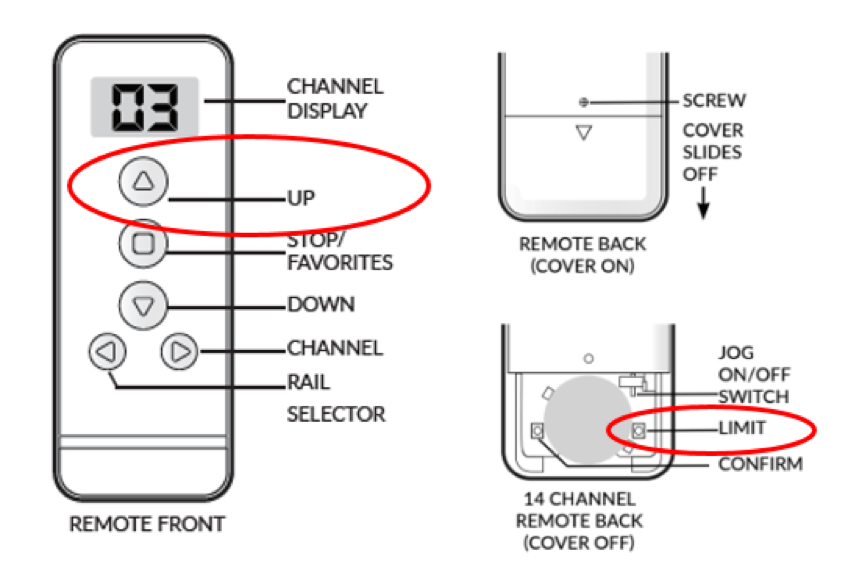
-
Setting Favorite Position on a Top Down-Bottom Up Shade
1. Select the proper channel for the shade you want to adjust
2. Unlink all other shades assigned to that channel
3. Move middle rail to desired Favorite Position using the proper rail selection, then the UP and DOWN arrow buttons.
4. Hit stop when you’ve reached your desired position. You can now jog (if JOG Function is enabled) to fine tune your position
5. Move bottom rail to desired Favorite Position using the proper rail selection, then the UP and DOWN arrow buttons
6. Choose proper rail setting to address BOTH moving rails
7. Press the “L” Button and UP button together until the shade responds (shade will beep and jog to confirm setting)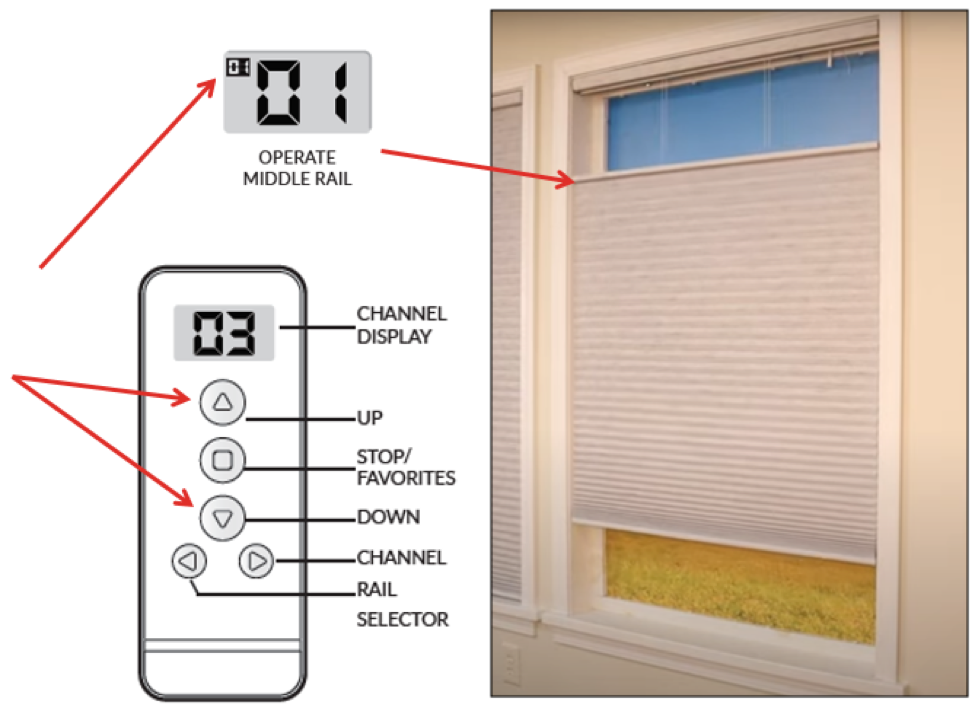
-
Mixing Shade Types on One Channel
You should not mix top down/bottom up shades and bottom up only shades on the same channel.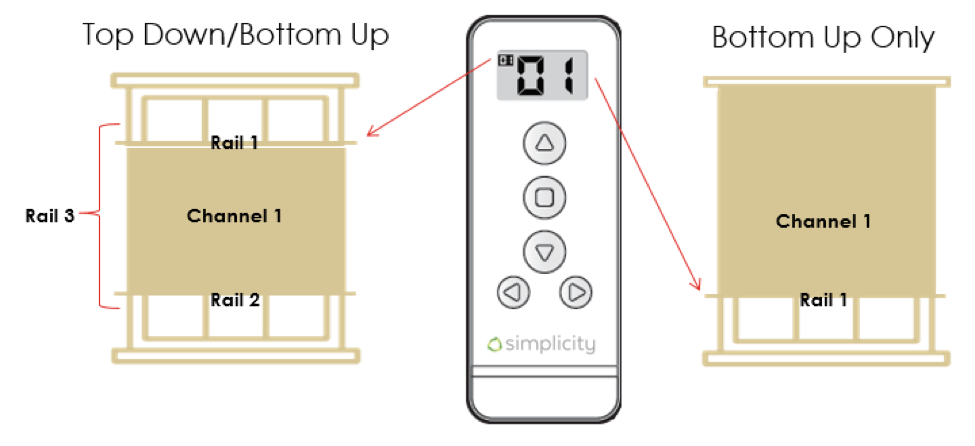
1. With Both Shades totally open (window exposed), if you select Rail 1 and hit the down button:
-The Top Down-Bottom Up will not move
-The Bottom Up Will close
2. With both shades covering the window, if you select Rail 1 and hit the down button:
-The middle rail of the Top Down-Bottom Up will go down
-The Bottom Up shade will not move
3. With both shades in the position shown, if you select Rail 1 and hit the down button:
-The middle rail of the Top Down-Bottom Up will go down and meet Rail 2
-The Bottom Up shade will close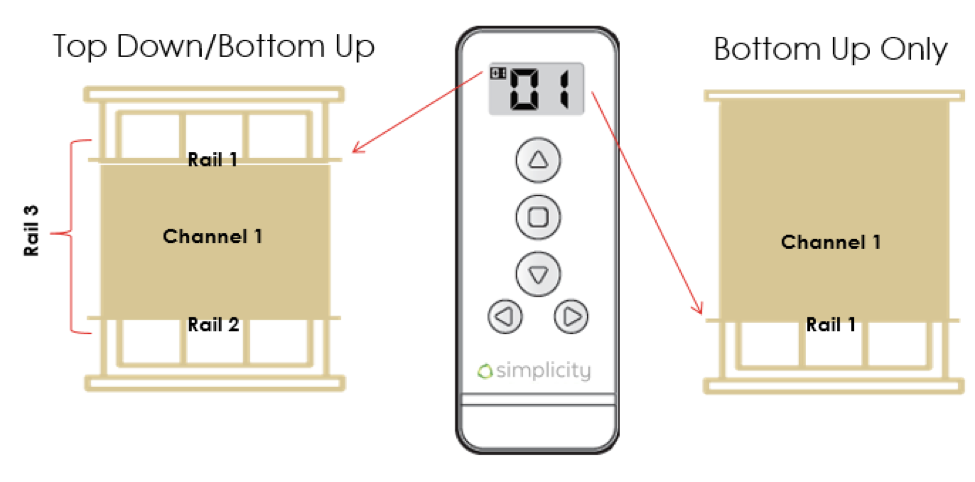
-
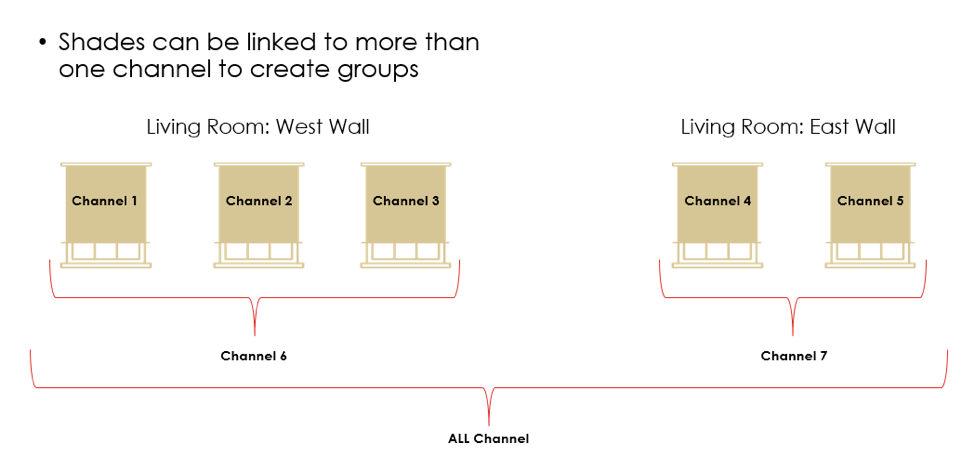
Creating Groups of Shades
– One shade per channel is recommended
– This allows you to change settings on individual shades, without affecting other shades
– Use extra channels to customize groups if needed
All shades linked to a remote will automatically be linked to the ALL channel
-
Unlinking Your Shade from a Remote Control
– Choose the Channel that you want to unlink a shade from
– Press the “C” Confirm Button on the back of the Remote Control and release
– Shade will beep and jog
– Continue to press and release the “C” Button until the shade confirms the setting
– Press and release 3 to 8 times
– Shade will beep quickly 4 times and jog twice, this confirms your command to unlink
-
Setting Upper and Lower Limits
Select and Address the Shade you want to adjust:
1. Select the proper channel for the shade you want to adjust
2. Unlink all other shades assigned to that channel
3. Press and hold the “L” button on the back of the remote until the shade responds (beep and jog)
Set the Lower Stop Limit:
4. Move the bottom rail to the desired lower stop position. As you get close, hit the stop button.
5. Now you can use the Up and Down arrow buttons to jog into place.
6. Press the “C” button on the back of the remote to confirm (shade will beep and jog to confirm setting)
Set the Upper Stop Limit:
7. Move the bottom rail to the desired upper stop position. As you get close, hit the stop button.
8. Now you can use the Up and Down arrow buttons to jog into place.
9. Press the “C” button on the back of the remote to confirm (shade will beep and jog to confirm setting)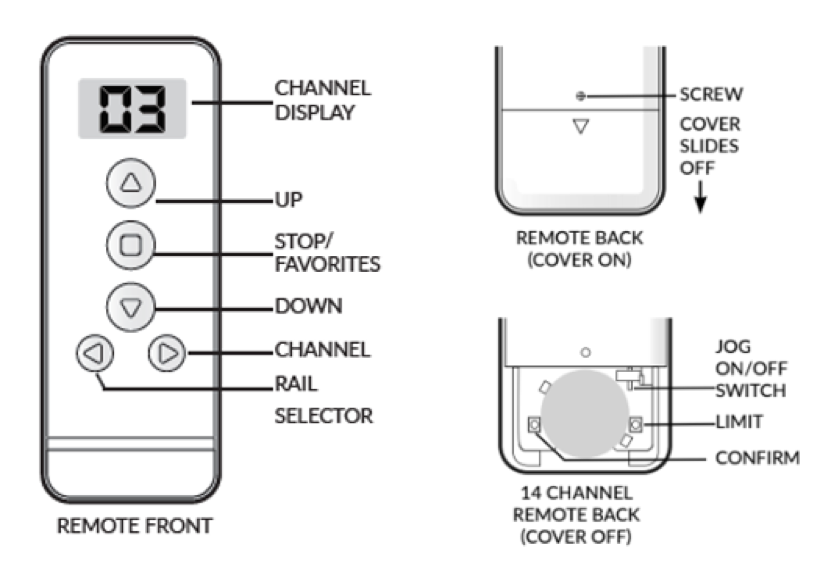
-
Setting Upper and Lower Limits on a Top Down-Bottom Up Shade
Setting Limits for Top Down-Bottom Up Shades:
1. Select the proper channel for the shade you want to adjust
2. Unlink all other shades assigned to that channel
3. Press and hold the “L” button on the back of the remote until the shade responds (beep and jog)
Set the Lower Stop Limit (Figure A):
4. Move the bottom rail to the desired lower stop position. As you get close, hit the stop button.
5. Now you can use the Up and Down arrow buttons to jog into place.
6. Move the middle rail to your desired upper stop position
7. Press the “C” button on the back of the remote to confirm (shade will beep and jog to confirm setting)
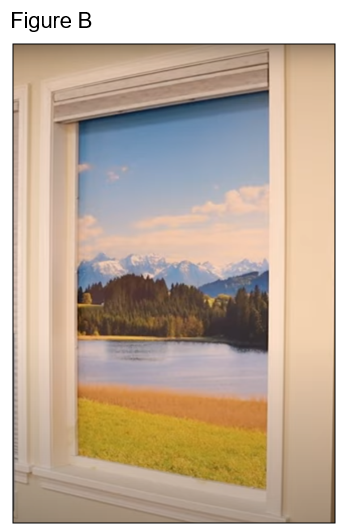
Set the Upper Stop Limit (Figure B):
8. Move the bottom rail to the desired upper stop position. As you get close, hit the stop button.
9. Now you can use the Up and Down arrow buttons to jog into place.
10. Press the “C” button on the back of the remote to confirm (shade will beep and jog to confirm setting)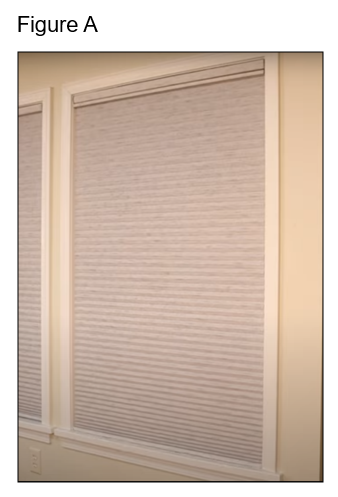
-
Setting Upper and Lower Limits with View
OPTIONAL for Sheer Shadings
– When setting lower limit, let the vanes open, and continue to let the shade “roll in reverse” before stopping to set lower limit.
– Do not let shade roll in reverse more than 24” off the window sill.
– Confirm lower limit, then set upper limit (shade rolled up in normal direction)
– You can use the Favorite Setting as a middle stop, with the rail on at the window sill, where desired.
-
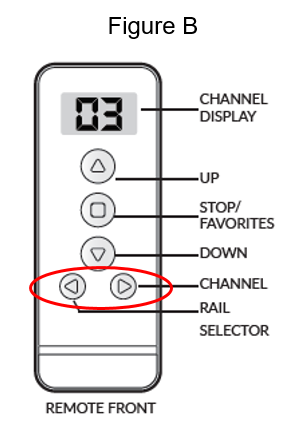
Hiding and Un-Hiding Unused Channels
– Press and hold UP and DOWN buttons together to activate setting (Figure A)
– Channel display will flash
– Use UP and DOWN arrows to choose the number of channels you want to be active
– Press the LEFT and RIGHT arrows together until display stops flashing (Figure B)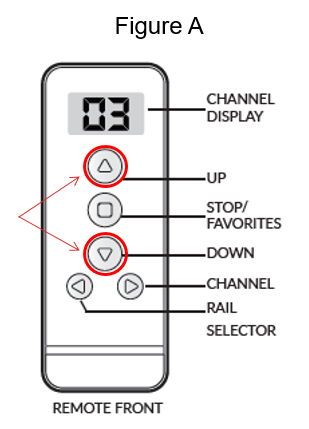
-
-
Installation & Operation Instructions
-
Smart Home Integrations
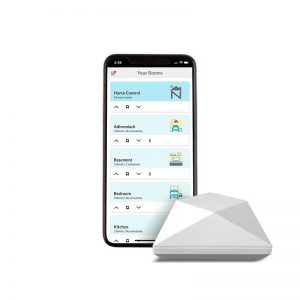
The NEO Smart Controller is required for Smart Home Integrations and Voice Control.
For specific instructions and troubleshoot download the how to guide below.
-
Troubleshooting
Motorized Shades Common Troubleshooting Questions:
Problem Solution The motor does not work.
- Check that the power source and motor are connected properly.
- If using a battery wand – confirm that the batteries are fresh and are placed in the wand in the correct orientation.
- If using rechargeable battery – Check charge level. If needed recharge your battery.
The motor continues to run in one direction.
The limit setting was unsuccessful and needs to be reset.
The indicator light on the remote does not shine or the remote-controlling range becomes shorter.
Replace the battery in the remote (CR2430 for Timer or 5 channel, CR2450 for 14 channel)
The motor stops working or works intermittently.
If using a battery wand, replace the batteries in the wand with 8 fresh AA alkaline batteries.
POWERTOUCH WAND – The shade moves the opposite direction of the arrow on the control button. Press and hold the SETTING button, then press and hold the STOP button. Hold both until the motor jogs (approx. 10 seconds). Why does my shade “beep” when I try to operate? You battery charge level is very low, and you should recharge your battery. Can the antenna wire(s) be clipped short so it isn’t visible?
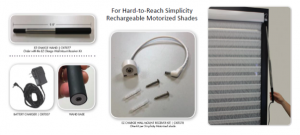
No! Do not clip your antenna wires. The motor will malfunction, and will likely not respond to your remote control or app commands. Can I add a solar panel? It is possible to add a solar panel to an existing Simplicity Remote Control shade. Contact your dealer for more assistance. (Solar panels are not compatible with PowerTouch Wand) Do the rechargeable batteries ever need to be replaced?
Rechargeable Li-Ion batteries last for many years and can be charged hundreds of times. If your batteries will not take a charge, contact your dealer for service. -
Quietude™ Technology
-
Color Lux® Mobile App
Motor Specifications
| Soft Start/Stop | Solar Charging Option | Sound Level decibels Lower = Quieter | Adjustable Speed Motor | |||||||
|---|---|---|---|---|---|---|---|---|---|---|
| Bluetooth Simplicity Roller | Internal Rechargeable LI-Ion Battery | Panel w/LED | ~39 dB | |||||||
| Bluetooth Simplicity Heavy Duty Roller | Internal Rechargeable LI-Ion Battery | Panel w/LED | ~42 dB | – | ||||||
| Bluetooth Simplicity Cellular Motor | Li-Ion Battery Pack inside Headrail | Panel w/LED | ~39 dB | |||||||
| Bluetooth Simplicity Cellular Top Down Bottom Up | Li-Ion Battery Pack inside Headrail | Panel w/LED | ~42 dB | |||||||
| Bluetooth Simplicity Odysee Motor | Li-Ion Battery Pack inside Headrail | – | Panel w/LED | ~49 dB | – | |||||
| Simplicity Cellular Motor | Li-Ion Battery Pack inside Headrail | – | – | – | – | Panel | ~50 dB | – | ||
| Simplicity Cellular Top Down Bottom Up | Li-Ion Battery Pack inside Headrail | – | – | – | – | Panel | ~50 dB | – | ||
| Simplicity Roller Motor | Internal Rechargeable LI-Ion Battery | – | – | – | – | Panel | ~47 dB | – | ||
| Simplicity Cellular Motor | Li-Ion Battery Pack inside Headrail | – | – | – | – | Panel | ~50 dB | – | ||
| Simplicity Cellular Top Down Bottom Up | Li-Ion Battery Pack inside Headrail | – | – | – | – | Panel | ~50 dB | – | ||
| Somfy Sonesse Ultra 30 WF RTS Li-Ion | Internal Rechargeable LI-Ion Battery | – | – | Panel | less than or = 45 dBA | |||||
| Somfy Sonesse 30 RTS DC | Plug-in Transformer | – | – | – | – | N/A | less than or = 44dBA~47dBA | |||
| Somfy Sonesse 50 RTS AC | Hardwired AC Power | – | – | – | – | N/A | less than or = 44dBA | – | ||
| Somfy Sonesse Ultra 50 AC | Hardwired AC Power | – | – | – | – | N/A | 38 dBA at 24 rpm | – | ||
| Somfy Tilt Only 50 Wirefree RTS | External Rechargeable LI-Ion Battery | – | – | – | – | Panel | Less than 56 dB | – | ||
| Simplicity PowerTouch Wand Roller/Sheer | Internal Rechargeable LI-Ion Battery | – | – | – | – | – | N/A | ~47 dB | – | |
| Simplicity PowerTouch Wand Cellular | Li-Ion Battery Pack inside Headrail | – | – | – | – | – | N/A | ~50 dB | – |
The Color Lux Mobile App allows direct communication with your Smartphone and your Bluetooth motorized shades, with no need for a hub, and no need for WiFi. With Color Lux Bluetooth motors, you can choose to use Color Lux Mobile, or the NEO Smart App. The NEO Smart hub allows Smart home integration and voice commands. (Siri voice commands do not require NEO Smart Hub)
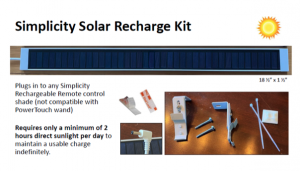
Yes and no. You can use a solar panel in any window to extend the life of your battery charge, however, only windows that receive at least two hours of direct unobstructed sunlight per day, on average, will maintain a battery charge indefinitely; meaning that you never have to manually charge your batter with a plug-in charger.
Yes, When using the Color Lux Mobile app with Color Lux Bluetooth motors, your smartphone can communicate directly with your motors using Bluetooth communication with no need to go through WiFi.

Hey Google, Amazon Alexa, IFTT, Control 4, Savant, Indigo Domotics.
For detailed set up and operating instructions for integrating your shade motors with the various Smart Home systems supported, please visit this link from our partners at NEO Smart Blinds: https://neosmartblinds.com/smartcontroller-integrations/
If you have further questions, you can contact our Technical Services Team, or contact the Technicians at NEO Smart Blinds directly to help walk you through the process.

The range of the RF remote control is approximately 30 Meters or 100 Feet.

Our new panel features smart LED performance indicators on the room side of the panel so you can monitor the amount of sunlight energy collected and confirm that the panel is actually sending energy to your rechargeable battery pack.
A “Favorite” setting is a position setting that you specify for the motor to run to, at your command. It is a third position setting, the other two being the up stop and down stop positions. The favorite position must be between the up and down stop settings. Note: the Color Lux Mobile app allows you to set multiple favorite positions on individual shades.
No, motorized shades can only be operated using a remote control, Color lux Mobile App, NEO app or the wand control on a PowerTouch shade.
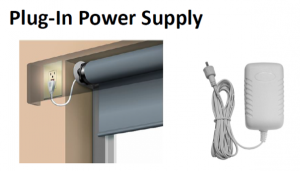
If you need to operate, your Simplicity motorized shade and your batteries are dead, plug in the charger, and within a few minutes, the charger will have provided enough energy to the battery pack to operate your shade. Leave the charger plugged in to continue charging your batteries.

The average battery charge will last 6-12 months based on an average sized shade raised and lowered once per day.
The life of the battery charge will vary based on the type of the window covering, the size and weight of the window covering and the number of times the shade is being operated on a daily basis
Batteries can be recharged in excess of 500 times.

- 8.4 Volt Charger for Li-Ion.
- Sold separately.
- Charger included.
- Used for all Rechargeable Remote Control Motors
- 13 Foot Cord; can use a common household extension cord if needed.
- LED light charger will turn from red to green when batteries are fully charged.
- It takes approximately 5 hours to recharge the Li-Ion battery when fully depleted.
Recharging a Roller style motor:
Recharging a Color Lux Cellular Motor:
Recharging a NON-Color Lux Cellular Motor:

The Comfortex YouTube Channel has dozens of product videos, including motor troubleshooting, motor programming and many other topics.
It is not a good idea to leave your battery charger plugged in permanently. This will keep the battery under continuous stress, will prematurely age and exhaust the battery, requiring replacement.
It is perfectly fine to leave your charger plugged in overnight to charge your battery, but you should unplug the charger when battery is fully charged.
Effective Bluetooth communication is limited to five individual signals at a time. If more than five Bluetooth signals are sent simultaneously, there can be dropped signals. This is a Bluetooth spec, and our Color Lux Mobile app was set up within the current performance specs set by Bluetooth.
If you have more than five shades in a single room, it is suggested to set up two rooms to accommodate all of the shades within that room, such as “Living Room Left” and “Living Room Right”.
For the remote control, the included 3V battery commonly lasts several years.
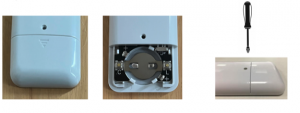
To replace the battery in the remote control, remove the back cover as shown below, remove the old battery using your finger nail or small screwdriver, and snap in your new battery and replace the cover.
Basic troubleshooting information can be found in the following locations:
- The installation instructions included with each motorized shade
- Installation Instructions online by following this link
- Trouble Shooting online
- You can also contact our Technical Services Team at 800-843-4151.
You can find all details regarding the warranty on all comfortex products here: https://comfortex.com/warranty-information/
In General, Comfortex offers a Limited Lifetime Warranty on materials and workmanship to the original purchaser with some exceptions as spelled out in the official warranty at the above link.
Our warranty for motor components, electronics and LI-Ion Battery cartridges is Five Years from the date stamped on each product.
Some electronic dealers offer only a 30 day warranty, others, such as Amazon Alexa offer a one year warranty from date of purchase. The Five Year Warranty offered by Comfortex is very generous for electronics and wearable components included in the motors, and is a testament to our dedication to ongoing dealer and consumer product support.
In some cases this is possible, but you will need to speak to our Technical Services Team. Make sure to have original order information available so the Tech Rep can make an assessment.
It is always recommended to have a plug-in charger as a back up to solar charging. Solar charging performance can be affected by variations in weather, the changing of the seasons, the location of the installation, what direction the window faces, etc.
Solar panels will always extend the life of your battery charge, regardless of variables.
Windows that receive at least two hours of direct unobstructed sunlight per day, on average, will maintain a battery charge indefinitely; meaning that you never have to manually charge your batter with a plug-in charger.
Here are some ideas to be considered based on application:


Features & Benefits
of Motorized Shades
Child Safety
Our motorized window treatments removes the need for cords and reduces potential child and pet safety hazards.
Easy Operation
Raise, lower, and tilt your shades with a click or tap of a button. No more fiddling with cords to adjust the position of your shades.

Bluetooth® Enabled Product
Bluetooth® wireless technology is available on all Color Lux® shades. You can control your shades right from your phone using the The Color Lux® Mobile App. No need for a separate remote or smart controller.

Solar Panel Charging
The Simplicity Solar Panel is our most advanced solar recharging system ever. The solar panel recharges the motorized window treatment’s battery with a simple plug-in. Rest assured that the panel is still providing charging even on those cloudy days.

Remote Control Options
Simplicity Rechargeable Motorized Shades with remote control use radio frequency transmission to operate the shade. Radio frequency motorization offers the simple convenience and child-safe method of operating shades.